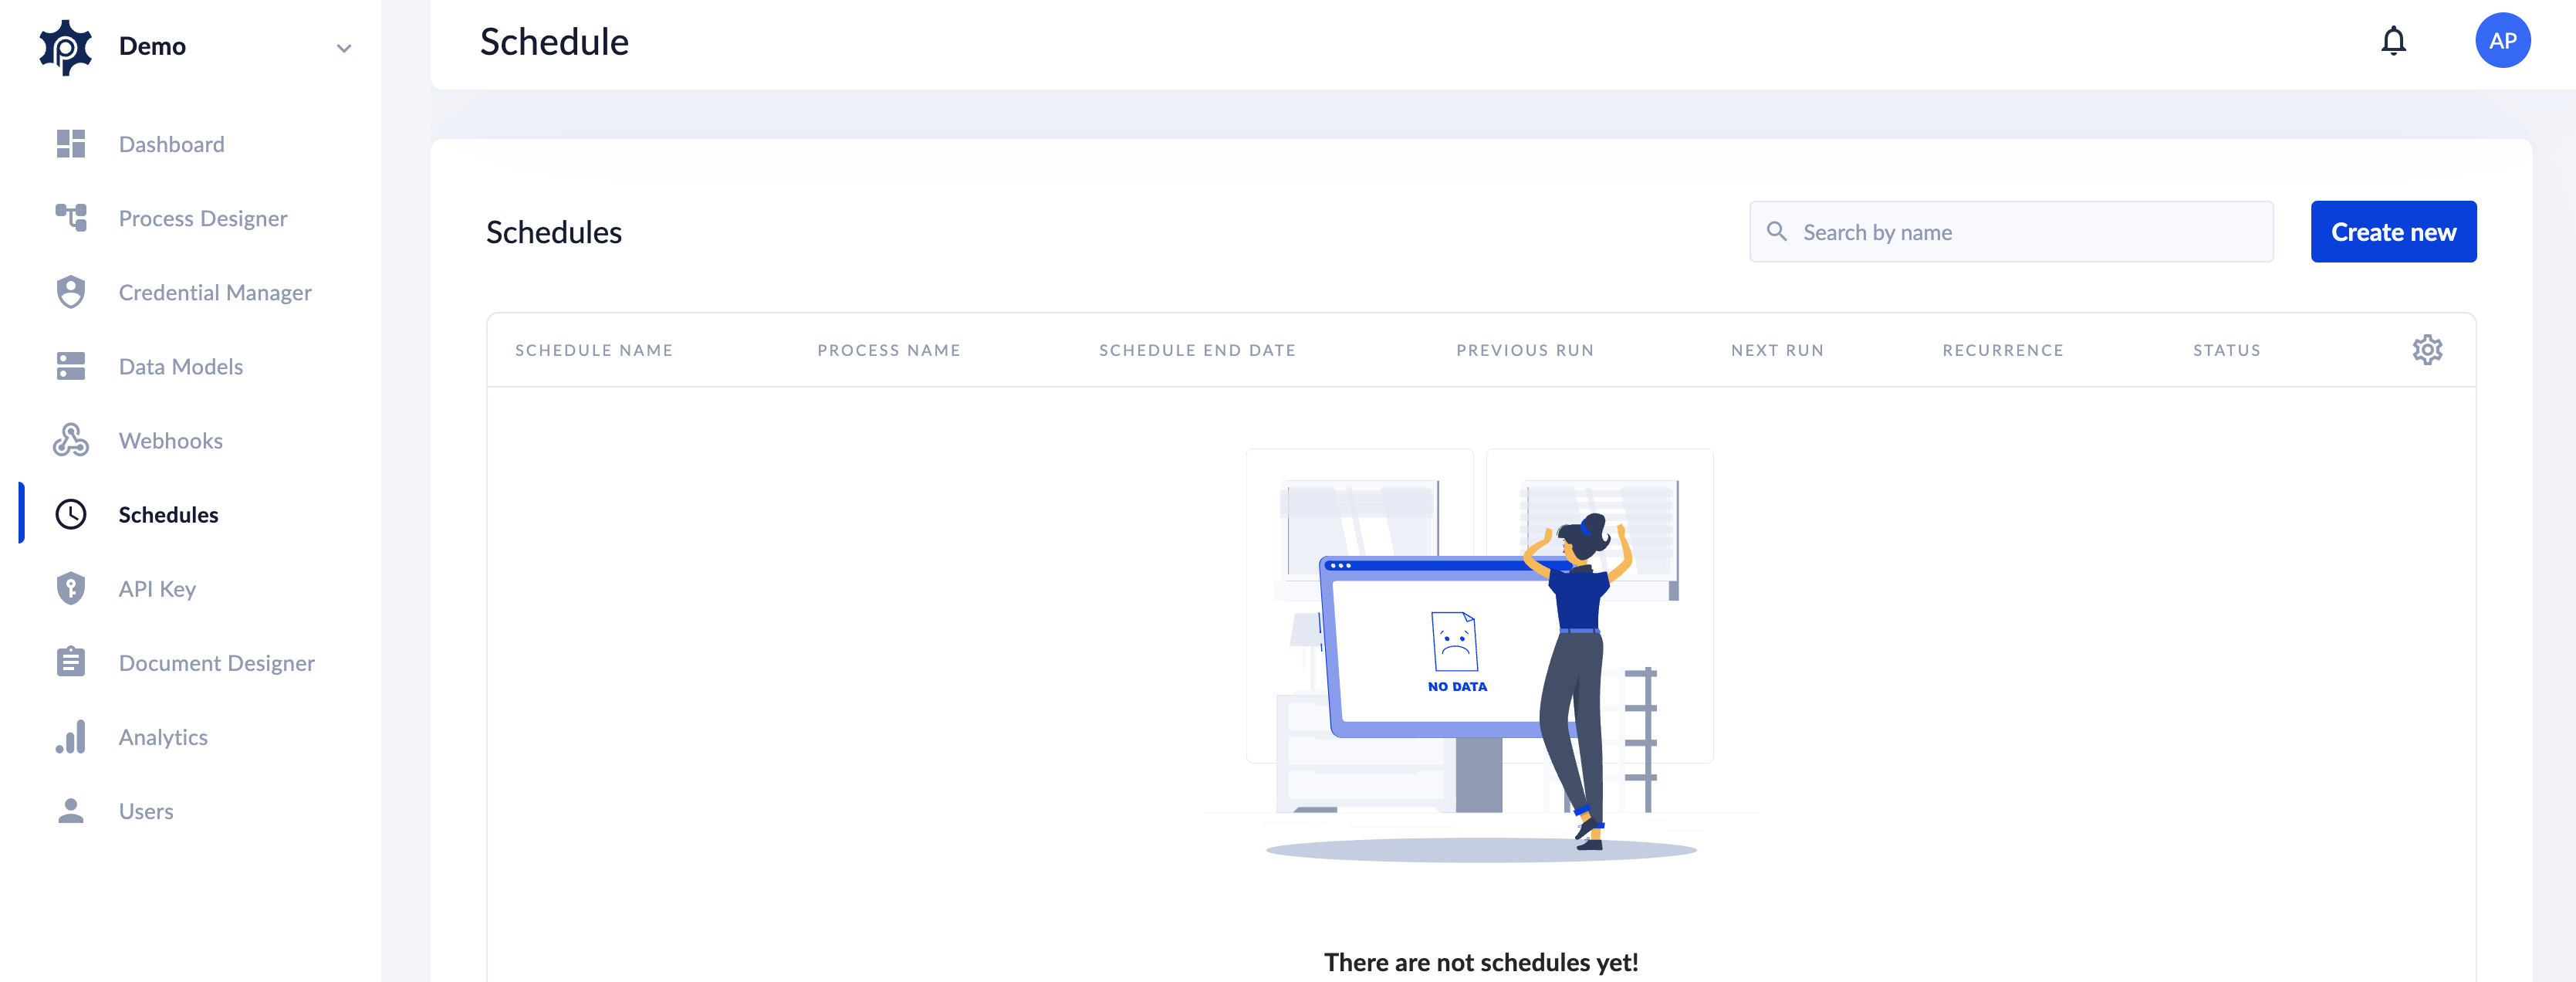
Schedules
Scheduled processes are automated processes that can be performed at a specific time or on a recurring schedule.
Scheduled processes are automated processes that can be performed at a specific time or on a recurring schedule.
If you have a process that needs to be run:
- once, on a specified date or time or
- on a regularly recurring basis, say once a week, twice a month or once a year, you can schedule your process in Schedules page to run automatically.
The scheduler automatically runs a process for you. You can add contacts that will receive an email notification based on process completion status (completes/fails/both).
Below are some examples of scenarios requiring scheduled processes:
- To schedule an onboarding flow for your new employees.
- To create monthly payroll files.
- To create annual reports at the end of financial year.
If you need the same process to recur at different dates and times, you are able to set that. If you have set up at least one schedule for a process, you can duplicate that schedule and change some settings as needed. This will save you time on setting the next one.
How to set up a schedule
Step 1: Go to Schedules page.
Step 2: Click Create New.
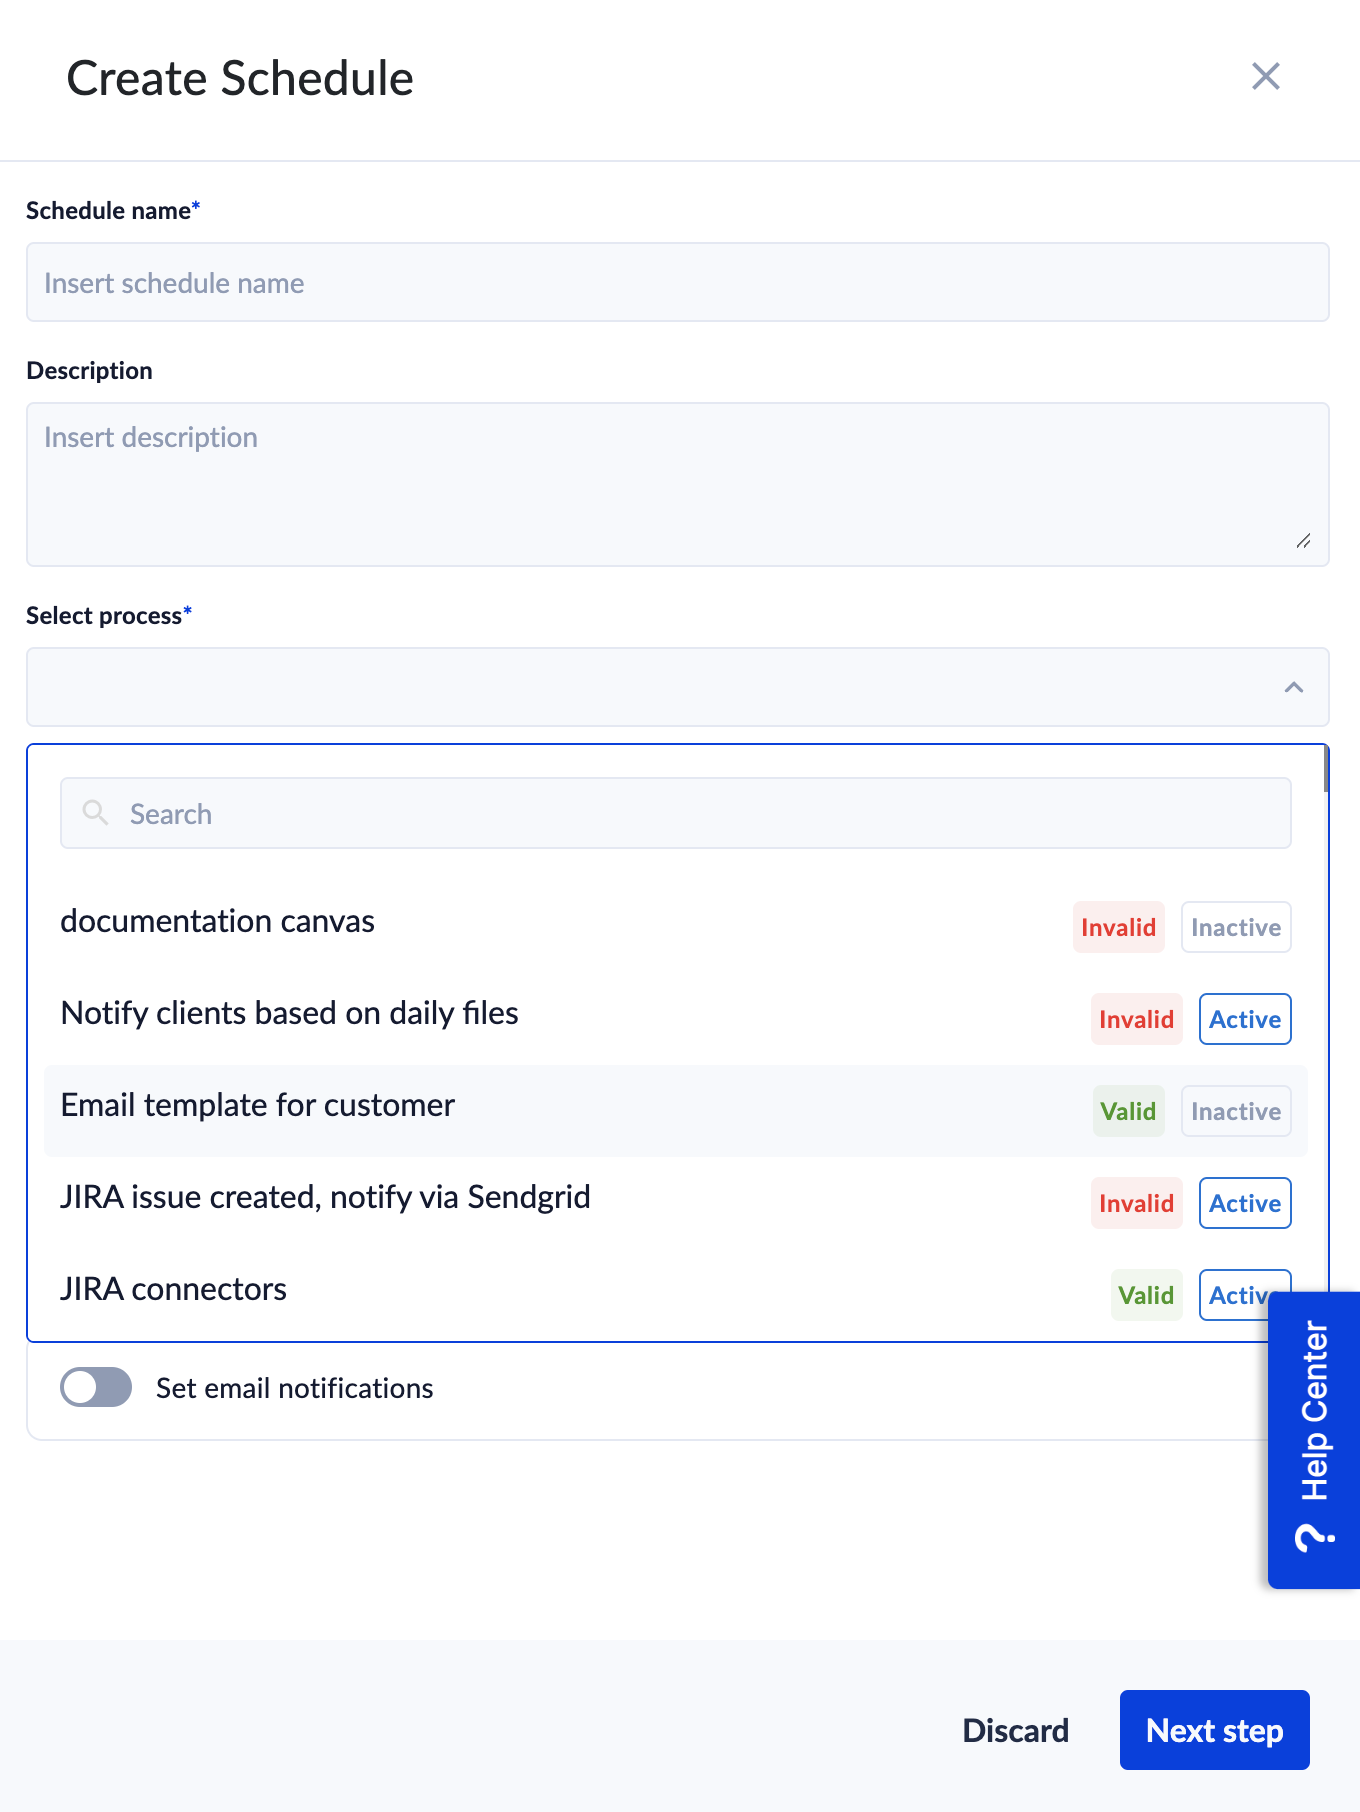
Step 3: Give a Name to your schedule.
Step 4: Add a Description to help others identify the scope of the schedule (optional).
Step 5: Select the Process you wish to use the schedule on.
In the list, you will notice that processes are marked Valid/Invalid (meaning that there are errors in process configuration that must be fixed) or Active/Inactive (meaning that a process is deactivated and execution cannot be initiated until switched to an active state).
If a process is invalid and/or inactive, you can still configure the schedule, however, it will not run at the set start date and time.
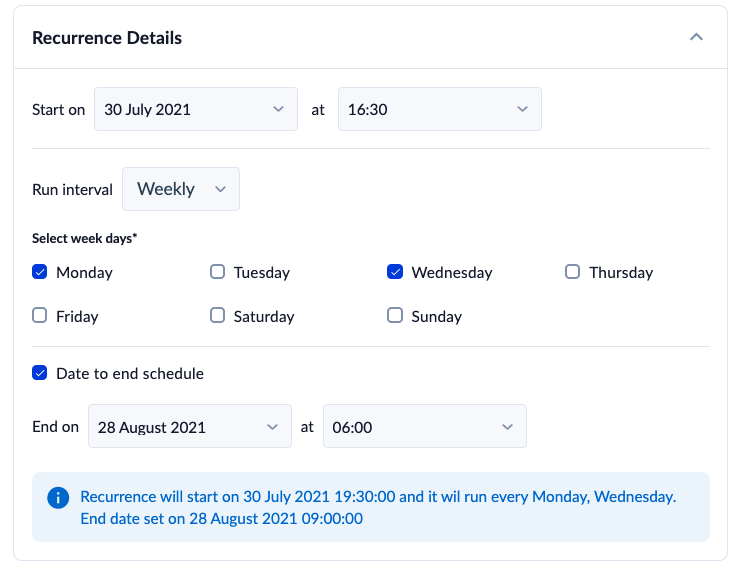
Step 6: Set Recurrence details
Start on: The start date and time are required fields and it’s where you can select the date and time that your first scheduled process will be run on.
Start time will reflect your local Time zone. You can only schedule processes to run on future dates and times.
The Run interval dropdown menu will let you select how often your process will be run.
- Once means that your process run will not be repeated – it will only run once, at the date and time you select, for example at the date and time of an upcoming meeting
- Minutes runs your process every set number of minutes, for example every 15 minutes.
- Hourly runs your profess every set number of hours, for example every 6 hours.
- Daily runs your process every day for example every day. You can also exclude weekend days.
- Weekly lets you select one or more days of the week the process will run. For example, every week on Monday and Friday
- Monthly will schedule your process to run every month in a specific day (1,2 or Last day of month). You can also choose to repeat on either the same day of the month as the first or the last day of the week (First Monday).
- Yearly runs your process every year. You can choose to repeat on the same day (Every March 10) or the same day of the month as the first or the last day of the week (Last Friday of December).
Date to end schedule: select the checkbox to access the field that let you select when your scheduled process runs will be due to be finished.
Once the recurrence is configured, read the summary at the bottom and double-check that the settings details are correct.
We do not recommend a frequency lower than 5 minutes at this point.
Step 7: Notifications
PROCESIO can send notifications to users informing them on the completion of a scheduled process. This is an optional step. You can add email addresses (yours or others within workspace) to receive an email notification once the scheduled process has run.
Users can be notified based on completion status of the process:
- only when process run successfully
- only when process failed
- both
You can add multiple email addresses using ";" as a separator.

Step 8: Click Next to move to the next configuration step
Step 9: Give values to your Process Input(s)
If the process selected to be scheduled has input process variables defined at process level, you must give values to these variables in order for the process to kick off with desired values. Else, the inputs variables will get the system default value based on data type (e.g. a process variable type integer will get 0 value when initiating the process).

Step 10: Save your schedule
Managing the schedules
You can view the schedules created in Schedules page.
From here you can update or change the settings to a schedule, duplicate a schedule or delete a schedule.
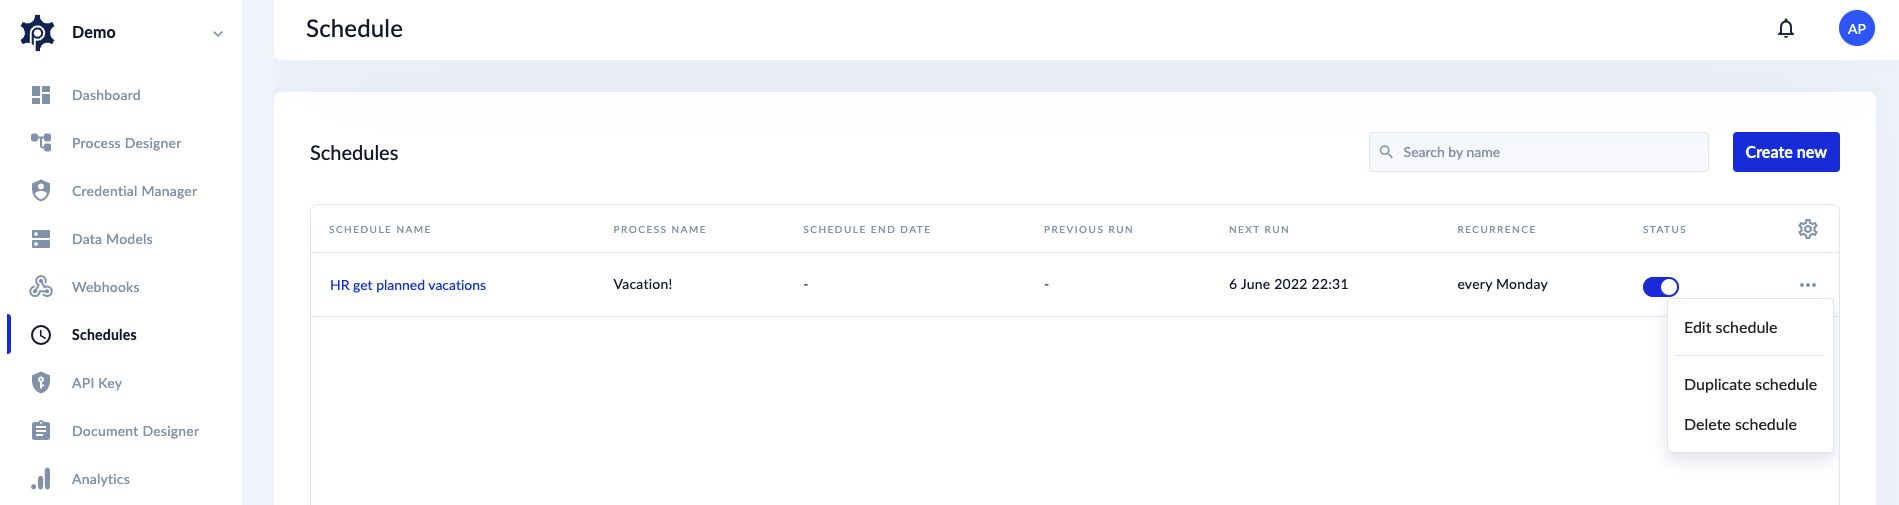
You can also Enable/Disable a schedule. You may encounter a situation that requires you to disable the scheduler for one or more processes, such as during maintenance periods, holidays or when execution of one process may interfere with another. In such cases, you can disable one or more processes from starting automatically. When you disable a workflow, the Schedule does not run the process until you enable it back.
Use the status toggle to disable/enable your processes.

If the process is set to run once, it will be automatically disabled after it runs. Also, if a process has an end date set, it will automatically be disabled once the end date is passed. You must edit and update the schedule to a future start date and time.